hugo+stack搭建笔记
下载安装hugo:
Releases · gohugoio/hugo (github.com)
hugo_extended_0.120.4_windows-amd64.zip
一般下载extended版本。解压后就一个hugo.exe可用,也没必要配置什么系统变量,直接复制到D盘吧。
新建hugo
本例目录hugo_blog
1
|
hugo new site hugo_blog
|
当然,你也可以先创建仓库,clone下来,用force参数,在已存在的目录创建hugo
1
|
hugo new site hugo_blog --force
|
安装模板
进入hugo目录,添加子模块
1
|
git submodule add https://github.com/CaiJimmy/hugo-theme-stack/ themes/hugo-theme-stack
|
复制模板例子
themes\hugo-theme-stack\exampleSite 这里是模板示例,将这里的文件全部复制到hugo_blog目录
启动hugo
将刚才D盘的hugo.exe也复制进hugo_blog目录
删除hugo_blog目录的hugo.toml配置文件,我们使用模板示例时,配置文件不在这里,会冲突,删了就好。
在hugo_blog目录直接运行
http://localhost:1313
访问看看吧。
创建分类菜单
创建content\page\categories\index.md
 1
 2
 3
 4
 5
 6
 7
 8
 9
10
|
title: 分类
date: 2019-05-28
layout: "categories"
slug: "categories"
menu:
    main:
        name: 分类
        weight: -90
        params:
            icon: categories
|
创建标签菜单
创建content\page\tags\index.md
 1
 2
 3
 4
 5
 6
 7
 8
 9
10
|
title: tags
date: 2019-05-28
layout: "tags"
slug: "tags"
menu:
    main:
        name: 标签
        weight: -90
        params:
            icon: tag
|
修改头像
创建 assets\img\avatar.png
修改标题
修改config.yaml
title: 你想要的标题
修改副标题
修改config.yaml
sidebar:
subtitle: 你需要的副标题
修改github
修改config.yaml
1
2
3
4
5
6
7
8
9
|
menu:
    main: []

    social:
        - identifier: github
          name: GitHub
          url: https://github.com/jackadam1981
          params:
              icon: brand-github
|
修改config.yaml,没有twitter,就注释掉了
1
2
3
4
5
6
7
8
|
menu:
    main: []

        # - identifier: twitter
        #   name: Twitter
        #   url: https://twitter.com
        #   params:
        #       icon: brand-twitter
|
删除语言
默认设置多语言,我这水平不够,只留中文吧。
修改config.yaml
 1
 2
 3
 4
 5
 6
 7
 8
 9
10
11
12
13
14
15
16
17
18
19
20
21
22
23
24
|
languageCode: zh-cn

DefaultContentLanguage: zh-cn

# languages:
#     en:
#         languageName: English
#         title: Example Site
#         weight: 1
#         params:
#             description: Example description
#     zh-cn:
#         languageName: 中文
#         title: 演示站点
#         weight: 2
#         params:
#             description: 演示说明
#     ar:
#         languageName: عربي
#         languagedirection: rtl
#         title: موقع تجريبي
#         weight: 3
#         params:
#             description: وصف تجريبي
|
修改日期格式
修改config.yaml
1
2
3
4
5
|
    dateFormat:
        #published: Jan 02, 2006
	published: 2006-01-02
        #lastUpdated: Jan 02, 2006 15:04 MST
	lastUpdated: 2006-01-02 23:04 +8
|
创建favicon.ico
创建/static/favicon.ico
编辑config.yaml
1
2
3
4
5
6
|
params:
    mainSections:
        - post
    featuredImageField: image
    rssFullContent: true
    favicon: /favicon.ico #这行
|
创建新文章
在终端输入命令创建
powershell命令:
1
|
.\hugo.exe new post/202402/taro_vue_note.md
|
CMD命令
1
|
hugo new post/202402/taro_vue_note.md
|
修改新文章模板
修改文件:archetypes\default.md
 1
 2
 3
 4
 5
 6
 7
 8
 9
10
11
12
13
14
15
|
title: "{{ replace .Name "-" " " | title }}" #标题
description:      #描述、副标题
date: {{ .Date }} #自动生成日期
image:            #图片
math:             #是否开启公式
license:          #许可协议
hidden: false     #隐藏
comments: true    #评论
categories:
    - Test
    - 测试
tags:
    - Test
    - 测试
draft: false      #草稿
|
修改图片渲染模板
这步比较重要,我就在这里卡了2天,23年12月写了点文章,在vscode预览挺好的。上传也没注意。
最近又写了两篇,发现图片渲染不正确,路径缺失,hugo编译静态后,图片路径并不在文档相对路径。
How to use render-image.html to customize the rendering image path - support - HUGO (gohugo.io)
创建layouts\_default\_markup\render-image.html
1
2
3
|
<p class="md__image">
  <img src="/{{ path.Dir page.File }}/{{ .Destination | safeURL }}" alt="{{ .Text }}" {{ with .Title }} title="{{ . }}" {{ end }} />
</p>
|
Markdown 渲染钩子 |雨 果 (gohugo.io)
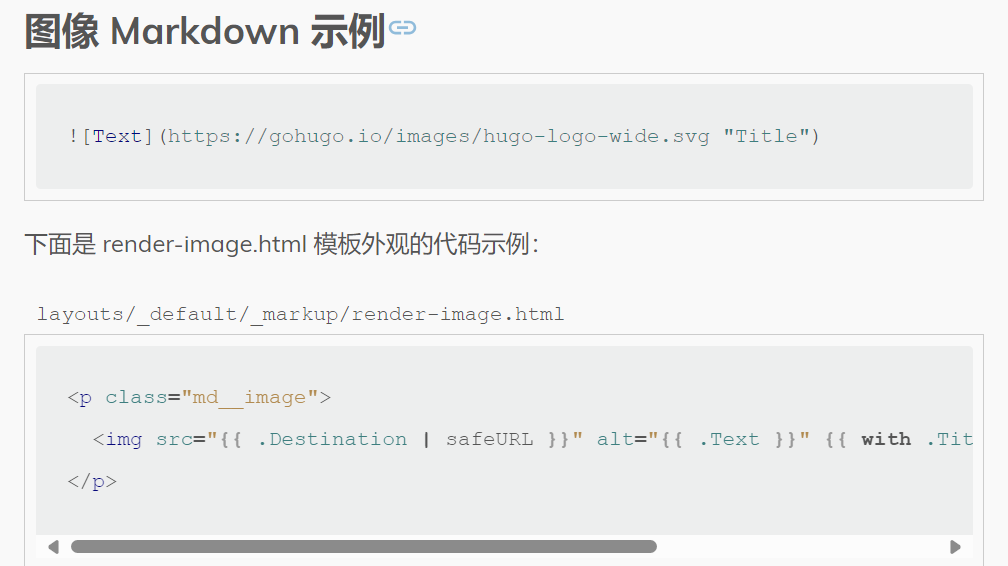
在src路径中添加了 /{{ path.Dir page.File }}/
终于全部解决,可以愉快的写博客了。